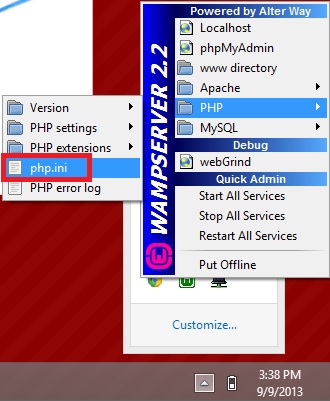
Now a days there are always tasks which require email notification, such examples are notify user on account creation, periodic notification for activities done by user, notify user on submission of form, etc. There are lots of other cases where you need to test the email and its content. In this post I'll be telling how can we send an email from our localhost.
FYI: Since Google Mail has changed its SSL security and removed support for v2 which is used by Sendmail.exe, those who will be configuring their GMail account will need to configured the Stunnel as well [Read More].
What you'll need:
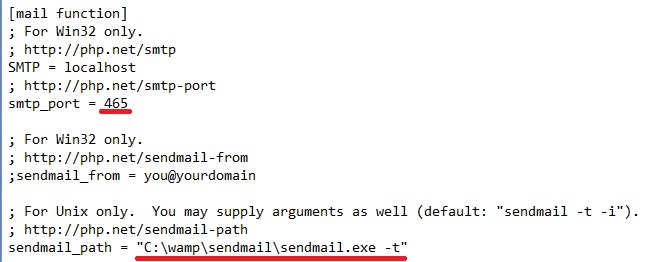
 In php.ini file search for sendmail_path and set its value as:
sendmail_path = "C:\wamp\sendmail\sendmail.exe -t"
Assuming you've not change any of the path from above.
In php.ini file search for sendmail_path and set its value as:
sendmail_path = "C:\wamp\sendmail\sendmail.exe -t"
Assuming you've not change any of the path from above.
 Save and close php.ini file.
For these changes to take effect you must need to restart your WAMP Server.
By now you should be able to send emails, but if you're using Windows 8 or using GMail like me, then you'll need to do few more configurations, like I did:
These few more configurations includes installing and configuring Stunnel, and configuring Sendmail with Stunnel.
Save and close php.ini file.
For these changes to take effect you must need to restart your WAMP Server.
By now you should be able to send emails, but if you're using Windows 8 or using GMail like me, then you'll need to do few more configurations, like I did:
These few more configurations includes installing and configuring Stunnel, and configuring Sendmail with Stunnel.
- WAMP Server, download and install latest version. I'm using 2.2E 64Bits
- Fake Sendmail for Windows
- An email account with any email providers, I'm using GMail account.
- Stunnel (if Fake Sendmail itselft doesn't work)
- Line no. 14 | smtp_server=smtp.gmail.com # if gmail, if configured with stunnel use localhost
- Link no. 18 | smtp_port=465 # if gmail, if configured with stunnel use 25
- Link no. 27 | smtp_ssl=auto # if gmail, if configured with stunnel use none
- Link no. 46 | auth_username=youremail@gmail.com
- Link no. 47 | auth_password=yourpassword
In php.ini file search for sendmail_path and set its value as:
sendmail_path = "C:\wamp\sendmail\sendmail.exe -t"
Assuming you've not change any of the path from above.
Save and close php.ini file.
For these changes to take effect you must need to restart your WAMP Server.
By now you should be able to send emails, but if you're using Windows 8 or using GMail like me, then you'll need to do few more configurations, like I did:
These few more configurations includes installing and configuring Stunnel, and configuring Sendmail with Stunnel.
- Download Stunnel form Stunnel site and install.
- Locate your stunnel.conf file to configure, either using start menu or by going to "C:\Program file\stunnel" for 32Bits and "C:\Program file (x86)\stunnel" for 64Bits.
- To edit this file you'll need administrative permissions, so just copy this file to Desktop and make necessary changes and then replace the original file in above location. Following are the changes you'll need to do:
cert = stunnel.pem
socket = l:TCP_NODELAY=1
socket = r:TCP_NODELAY=1
key = stunnel.pem
[ssmtp]
accept = 465
connect = 25
[gmail-smtp]
client = yes
accept = 127.0.0.1:25
connect = smtp.gmail.com:465
; To check logs you can enable logging using following lines
debug = 7
output = stunnel.log ; You will need to create this file if doesn't exists already and give proper permissions to current user. - Run Stunnel (Everytime you make any changes in stunnel.conf you'll need to reload it using "configuration => Reload Stunnel.conf")
- Make sure you've made changes provided above with comment saying for stunnel